Friday 31 March 2017

Step-wise how to create remote Queue in IBM MQ

Step-wise how to create remote Queue in IBM MQ


A local definition of a remote queue is a definition on a local queue manager that refers to a queue on a remote queue manager.

You do not have to define a remote queue from a local position, but the advantage of doing so is that applications can refer to the remote queue by its locally-defined name instead of having to specify a name that is qualified by the ID of the queue manager on which the remote queue is located.

Step 1: Go to All Programs and click on “Websphere MQ Explorer”.

Step-wise how to create remote Queue in IBM MQ

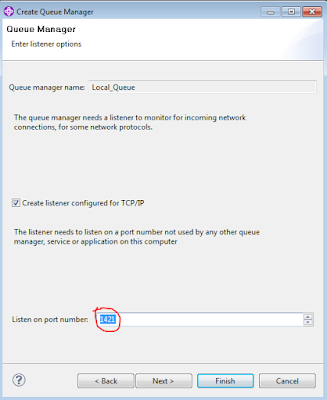
 Step 2: Right Click on Queue Managers and create 2 Queue Manager as Local_Queue and        Remote_Queue.
Step-wise how to create remote Queue in IBM MQ

Step-wise how to create remote Queue in IBM MQ

Step-wise how to create remote Queue in IBM MQ

Step-wise how to create remote Queue in IBM MQ

 Same way create other Queue manager "Remote_Queue".

Step 3: Create transmission queue as local queue under “Remote_Queue” manager. Right click on Queues and click on Local Queue.

Step-wise how to create remote Queue in IBM MQ

 Step 4: Put Name as “TRANS.TEST”. Click on Next.

Step-wise how to create remote Queue in IBM MQ
 Select Usage as “Transmission”.
Step-wise how to create remote Queue in IBM MQ
Step 5: Create sender channel as REMOTE.CHANNEL in Remote_Queue manager.

Step-wise how to create remote Queue in IBM MQ

Step-wise how to create remote Queue in IBM MQ

Pass connection name as host name and port to with we intend to connect (host name will be IP of other system or localhost and port will be listener port number of other system's or local queue manager like localhost (1421)) and transmission queue will be "TRANS.TEST". Click on finish and will get successful creation of message object.

Step-wise how to create remote Queue in IBM MQ

Step 6: Create Receiver channel in Local_Queue manager with same name as sender channel REMOTE.CHANNEL in Remote_Queue manager.

Step-wise how to create remote Queue in IBM MQ


Step 7: Create Local Queue in Local_Queue manager and click on finish.

Step-wise how to create remote Queue in IBM MQ

Step-wise how to create remote Queue in IBM MQ


Step 8: Create Remote Queue Definition in Remote_Queue manager.

Step-wise how to create remote Queue in IBM MQ

Step-wise how to create remote Queue in IBM MQ

Step-wise how to create remote Queue in IBM MQ


Step 9: Right click on sender channel of Remote_Queue manager and click on start.

Step-wise how to create remote Queue in IBM MQ

If all above configuration set correctly than sender channel will start and will change status as running. correspondingly,Receiver channel will also start.

Step-wise how to create remote Queue in IBM MQ

Step 10: Right click on remote queue in Remote_Queue manager and put some test message and check receiver queue in Local_Queue manager is receiving this message or not.

Step-wise how to create remote Queue in IBM MQ

Step-wise how to create remote Queue in IBM MQ

Step 11: Go to Local_Queue manager queue and check if this message received or not.

Step-wise how to create remote Queue in IBM MQ

Step-wise how to create remote Queue in IBM MQ


Related post:

How to install IBM MQ on windows


Step wise how to set up GIT in eclipse

Step wise how to set up GIT in eclipse


Read my previous post about step wise how to create and merge new branch in GIT.

Step 1: 

Step wise how to set up GIT in eclipse


Step wise how to set up GIT in eclipse

Step 3: Select first option.

Step wise how to set up GIT in eclipse

Step wise how to set up GIT in eclipse

Step wise how to set up GIT in eclipse

Step 4: Click yes and installation complete.

Step wise how to set up GIT in eclipse

Step 5: Open customised perspective.

Step wise how to set up GIT in eclipse

Step 6: Select Git. It will add options in toolbar.

Step wise how to set up GIT in eclipse
Step 7: Go to preference.

Step wise how to set up GIT in eclipse

Step 8: Click on git and give path of local  repository created in earlier post.

Step wise how to set up GIT in eclipse

Step 9: Give email and name in configuration.
               user.name and user.email

Step wise how to set up GIT in eclipse

Step 10: Right click in project Explorer and go to import.

Step wise how to set up GIT in eclipse

Step 11: Select projects from git.

Step wise how to set up GIT in eclipse

Step 12: Select Existing local repository.

Step wise how to set up GIT in eclipse

Step 13: Click on Add.

Step wise how to set up GIT in eclipse

Step 14: Check the box. And click finish.

Step wise how to set up GIT in eclipse

Step 15: Select Git Repository name and next.

Step wise how to set up GIT in eclipse

Step 16: Select Import a general project and select on project name & click next.

Step wise how to set up GIT in eclipse

Step wise how to set up GIT in eclipse


Step 17: We can see project structure having src , WebContent and build.gradle if project is gradle.

Step wise how to set up GIT in eclipse

Step 18: Right click on project and configure then Add Gradle Nature.

Step wise how to set up GIT in eclipse


Related post:

Step wise how to create and merge new branch in GIT


Friday 17 March 2017

How can I disable application context info in log or console

How can I disable application context info in log or console

Visit my previous post, Step wise how to implement spring logging with log4j.

When implement spring logging with log4j, logger prints all application context info on console and file, which I don't want. I want disable application context info in log or console.

Log4J dependency

//LOG4J
    compile 'log4j:log4j:1.2.17'
    compile 'log4j:apache-log4j-extras:1.2.17'

log4j.properties


# LOG4J configuration
log4j.rootLogger=INFO, CONSOLE, FILE

log4j.appender.CONSOLE=org.apache.log4j.ConsoleAppender
log4j.appender.CONSOLE.layout=org.apache.log4j.PatternLayout
log4j.appender.CONSOLE.layout.ConversionPattern=%-7p %d [%t] %c %x - %m%n
log4j.logger.org.hibernate =WARN

log4j.appender.FILE=org.apache.log4j.rolling.RollingFileAppender 
log4j.appender.FILE.rollingPolicy=org.apache.log4j.rolling.FixedWindowRollingPolicy 
log4j.appender.FILE.rollingPolicy.maxIndex=2 
log4j.appender.FILE.triggeringPolicy=org.apache.log4j.rolling.SizeBasedTriggeringPolicy 
#log4j.appender.FILE.triggeringPolicy.MaxFileSize=5000000
log4j.appender.FILE.triggeringPolicy.MaxFileSize=50000
log4j.appender.FILE.rollingPolicy.FileNamePattern=D:/Error-%i.log 
log4j.appender.FILE.rollingPolicy.ActiveFileName=D:/Error.log
log4j.appender.FILE.layout=org.apache.log4j.PatternLayout 
log4j.appender.FILE.layout.ConversionPattern=%d %-5p - %c %x %m%n


Application context info log

INFO    2017-03-17 16:34:58,417 [main] org.springframework.context.support.ClassPathXmlApplicationContext  - Refreshing org.springframework.context.support.ClassPathXmlApplicationContext@74650e52: startup date [Fri Mar 17 16:34:58 IST 2017]; root of context hierarchy
INFO    2017-03-17 16:34:58,505 [main] org.springframework.beans.factory.xml.XmlBeanDefinitionReader  - Loading XML bean definitions from class path resource [rtpapp-config.xml]
INFO    2017-03-17 16:34:58,769 [main] org.springframework.beans.factory.xml.XmlBeanDefinitionReader  - Loading XML bean definitions from class path resource [common-config.xml]
INFO    2017-03-17 16:35:00,739 [main] org.springframework.context.support.PropertySourcesPlaceholderConfigurer  - Loading properties file from class path resource [mq-config.properties]
INFO    2017-03-17 16:35:00,741 [main] org.springframework.context.support.PropertySourcesPlaceholderConfigurer  - Loading properties file from class path resource [digisignature.properties]
INFO    2017-03-17 16:35:00,751 [main] org.springframework.context.support.PropertySourcesPlaceholderConfigurer  - Loading properties file from class path resource [mq-config.properties]
INFO    2017-03-17 16:35:00,886 [main] org.springframework.cache.ehcache.EhCacheManagerFactoryBean  - Initializing EhCache CacheManager
INFO    2017-03-17 16:35:03,050 [main] org.springframework.oxm.jaxb.Jaxb2Marshaller  - Creating JAXBContext by scanning packages [com.cfts.rtp.messages]
INFO    2017-03-17 16:35:05,980 [main] com.mchange.v2.log.MLog  - MLog clients using log4j logging.
INFO    2017-03-17 16:35:06,014 [main] com.mchange.v2.c3p0.C3P0Registry  - Initializing c3p0-0.9.2.1 [built 20-March-2013 10:47:27 +0000; debug? true; trace: 10]
INFO    2017-03-17 16:35:08,903 [main] org.springframework.context.support.DefaultLifecycleProcessor  - Starting beans in phase 2147483647
INFO    2017-03-17 16:35:09,375 [main] org.springframework.jms.connection.SingleConnectionFactory  - Established shared JMS Connection: com.ibm.mq.jms.MQQueueConnection@19b75b2b
INFO    2017-03-17 16:35:09,580 [main] org.springframework.jms.connection.SingleConnectionFactory  - Established shared JMS Connection: com.ibm.mq.jms.MQQueueConnection@79195c22


Solution : I found solution like to add 2 properties file(commons-logging.properties and simplelog.properties) in class path.

commons-logging.properties


org.apache.commons.logging.Log=org.apache.commons.logging.impl.SimpleLog

simplelog.properties


org.apache.commons.logging.simplelog.defaultlog=warn


Related Post: 

Stepwise how to implement spring logging with log4j
How to turning off hibernate logging console output

How to turning off hibernate logging console output

How to turning off hibernate logging console output

Visit my previous post, Step wise how to implement spring logging with log4j.

My project uses hibernate version 4.3.8 and when implement spring logging with log4j, logger prints all hibernate info on console and file, which I don't want. I want disable hibernate starting info in log or console.

Log4J dependency

//LOG4J
    compile 'log4j:log4j:1.2.17'
    compile 'log4j:apache-log4j-extras:1.2.17'

Hibernate property "hibernate.show_sql" and "hibernate.format_sql" set as false as below but still I was getting hibernate info log in console.

<property name="hibernateProperties">
            <props>
               <prop key="hibernate.dialect">org.hibernate.dialect.PostgreSQL82Dialect</prop>
                <prop key="hibernate.hbm2ddl.auto">update</prop>
                <prop key="hibernate.format_sql">false</prop>
                <prop key="hibernate.show_sql">false</prop>
            </props>
</property>


Hibernate info log

INFO    2017-03-17 16:09:07,472 [main] org.hibernate.Version  - HHH000412: Hibernate Core {4.3.8.Final}
INFO    2017-03-17 16:09:07,475 [main] org.hibernate.cfg.Environment  - HHH000206: hibernate.properties not found
INFO    2017-03-17 16:09:07,476 [main] org.hibernate.cfg.Environment  - HHH000021: Bytecode provider name : javassist
INFO    2017-03-17 16:09:09,266 [main] org.hibernate.hql.internal.ast.ASTQueryTranslatorFactory  - HHH000397: Using ASTQueryTranslatorFactory
INFO    2017-03-17 16:09:10,392 [main] org.hibernate.tool.hbm2ddl.SchemaUpdate  - HHH000228: Running hbm2ddl schema update
INFO    2017-03-17 16:09:10,393 [main] org.hibernate.tool.hbm2ddl.SchemaUpdate  - HHH000102: Fetching database metadata
INFO    2017-03-17 16:09:10,405 [main] org.hibernate.tool.hbm2ddl.SchemaUpdate  - HHH000396: Updating schema
INFO    2017-03-17 16:09:10,469 [main] org.hibernate.tool.hbm2ddl.TableMetadata  - HHH000261: Table found: rtp.admi004_msg_tb
INFO    2017-03-17 16:09:10,469 [main] org.hibernate.tool.hbm2ddl.TableMetadata  - HHH000037: Columns: [event_desc, event_id, event_param, event_code, rawmsg_id, event_time]
INFO    2017-03-17 16:09:10,470 [main] org.hibernate.tool.hbm2ddl.TableMetadata  - HHH000108: Foreign keys: []
INFO    2017-03-17 16:09:10,470 [main] org.hibernate.tool.hbm2ddl.TableMetadata  - HHH000126: Indexes: [admi004_msg_tb_pkey]
INFO    2017-03-17 16:09:10,499 [main] org.hibernate.tool.hbm2ddl.TableMetadata  - HHH000261: Table found: rtp.distinct_msg_tb
INFO    2017-03-17 16:09:10,499 [main] org.hibernate.tool.hbm2ddl.TableMetadata  - HHH000037: Columns: [msg_ut_id, resp_rawmsg_id, msg_status, distmsg_id]
INFO    2017-03-17 16:09:10,499 [main] org.hibernate.tool.hbm2ddl.TableMetadata  - HHH000108: Foreign keys: []
INFO    2017-03-17 16:09:10,499 [main] org.hibernate.tool.hbm2ddl.TableMetadata  - HHH000126: Indexes: [distinct_msg_tb_pkey]

Solution : I found one solution to add "log4j.logger.org.hibernate =WARN" in log4j.properties file.

log4j.properties


# LOG4J configuration
log4j.rootLogger=INFO, CONSOLE, FILE

log4j.appender.CONSOLE=org.apache.log4j.ConsoleAppender
log4j.appender.CONSOLE.layout=org.apache.log4j.PatternLayout
log4j.appender.CONSOLE.layout.ConversionPattern=%-7p %d [%t] %c %x - %m%n
log4j.logger.org.hibernate =WARN

log4j.appender.FILE=org.apache.log4j.rolling.RollingFileAppender 
log4j.appender.FILE.rollingPolicy=org.apache.log4j.rolling.FixedWindowRollingPolicy 
log4j.appender.FILE.rollingPolicy.maxIndex=2 
log4j.appender.FILE.triggeringPolicy=org.apache.log4j.rolling.SizeBasedTriggeringPolicy 
#log4j.appender.FILE.triggeringPolicy.MaxFileSize=5000000
log4j.appender.FILE.triggeringPolicy.MaxFileSize=50000
log4j.appender.FILE.rollingPolicy.FileNamePattern=D:/Error-%i.log 
log4j.appender.FILE.rollingPolicy.ActiveFileName=D:/Error.log
log4j.appender.FILE.layout=org.apache.log4j.PatternLayout 
log4j.appender.FILE.layout.ConversionPattern=%d %-5p - %c %x %m%n


Related Post:


Stepwise how to implement spring logging with log4j

How can I disable application context info in log or console

Stepwise how to implement spring logging with log4j

Step wise how to implement spring logging with log4j

Logging is very important for any application its give us insider information about application about its background and what happens in the application at debug and run time.

Logging is broken into three major pieces: the Logger, Formatter and the Handler (Appender). The Logger is responsible for capturing the message to be logged along with certain metadata and passing it to the logging framework. After receiving the message, the framework calls the Formatter with the message. The Formatter formats it for output. The framework then hands the formatted message to the appropriate Appender for disposition. This might include a console display, writing to disk, appending to a database, or email.


I will discuss on this post, how LOG4J property file to write output on log file and show on console as well.

Step 1: Download log4j.x.x.x.jar and copy it in lib folder of your project. If you are using Maven than add log4j dependency to your pom.xml like this.

<dependency>
    <groupId>log4j</groupId>
    <artifactId>log4j</artifactId>
    <version>1.2.17</version>
</dependency>

<dependency>
    <groupId>log4j</groupId>
    <artifactId>apache-log4j-extras</artifactId>
    <version>1.2.17</version>
</dependency>

If you are using Gradle than add log4j dependency to your build.gradle like this.

//LOG4J
    compile 'log4j:log4j:1.2.17'
    compile 'log4j:apache-log4j-extras:1.2.17'

Step 2: Add one of the configuration file either property file or xml file to your project and make sure the file is included in classpath.

Stepwise how to implement spring logging with log4j

# LOG4J configuration
log4j.rootLogger=INFO, CONSOLE, FILE

log4j.appender.CONSOLE=org.apache.log4j.ConsoleAppender
log4j.appender.CONSOLE.layout=org.apache.log4j.PatternLayout
log4j.appender.CONSOLE.layout.ConversionPattern=%-7p %d [%t] %c %x - %m%n
log4j.logger.org.hibernate =WARN

log4j.appender.FILE=org.apache.log4j.rolling.RollingFileAppender 
log4j.appender.FILE.rollingPolicy=org.apache.log4j.rolling.FixedWindowRollingPolicy 
log4j.appender.FILE.rollingPolicy.maxIndex=2 
log4j.appender.FILE.triggeringPolicy=org.apache.log4j.rolling.SizeBasedTriggeringPolicy 
#log4j.appender.FILE.triggeringPolicy.MaxFileSize=5000000
log4j.appender.FILE.triggeringPolicy.MaxFileSize=50000
log4j.appender.FILE.rollingPolicy.FileNamePattern=D:/Error-%i.log 
log4j.appender.FILE.rollingPolicy.ActiveFileName=D:/Error.log
log4j.appender.FILE.layout=org.apache.log4j.PatternLayout 
log4j.appender.FILE.layout.ConversionPattern=%d %-5p - %c %x %m%n

Step 3: Add required logging code to your project classes where you want to enable logging and store activities.
private static final Logger logger = Logger.getLogger(Home.class); // register class with logger
logger.info("Message info");  // implement required logging method

1.    package com.engineeernitesh.controller;

2.    import org.apache.log4j.BasicConfigurator;
3.    import org.apache.log4j.Logger;
4.    import org.springframework.stereotype.Controller;
5.    import org.springframework.web.bind.annotation.RequestMapping;
6.    import org.springframework.web.servlet.ModelAndView;

7.    @Controller
8.    public class Test {
9.    User user = new User();

10.  private static final Logger logger = Logger.getLogger(Test.class);

11.  @RequestMapping("/hello")
12.  public ModelAndView hello(){
13.       BasicConfigurator.configure();
14.       logger.debug("Debug..");
15.       logger.info("Info.."+user);
16.       logger.error("Error.."+user);
17.       logger.fatal("Fatal"+user);
18.       logger.trace("trace");
19.       return new ModelAndView("hello","message","HelloWorld");
20.      }
21.  }


Related Post:

How to turning off hibernate logging console output

How can I disable application context info in log or console