Friday, 24 February 2017

How to install IBM MQ on windows

How to install IBM MQ on windows


Step 1: Ask system admin to create new user and password for MQ. Add newly created user “xyz” by right click on Users with password “abc” under Computer Management.

How to install ibm mq on windows

Step 2: Create new group “mqm” and add newly created user “xyz” into “mqm” group. enter the object name as “xyz” and click on check names. Click on OK.

How to install ibm mq on windows

Step 3: Click on create. 

How to install ibm mq on windows

Step 4:  Similarly, add your system login ID (check administrator role from user account) on mqm group.

How to install ibm mq on windows

Step 5: Double click on setup.exe from installation path.

How to install ibm mq on windows

Step 6: Select No in Network Configuration option.

How to install ibm mq on windows

Step 7: Click on “Launch IBM Websphere MQ Installer” under Websphere MQ installation.

How to install ibm mq on windows

Step 8: After few seconds below setup screen will come, select below option and click on next.

How to install ibm mq on windows

Step 9: Select “Typical” option and click on next. And than click on install. Installation will take few minutes. After installation click on Finish.

How to install ibm mq on windows

Step 10: Click on Next and than again next.

How to install ibm mq on windows

Step 11: Give user name and password which is created by System admin. Click on next, if you will receive any error, kind  of user name and password mismatch ,Click on cancel and follow steps from 12 or else follow step 15. 

How to install ibm mq on windows


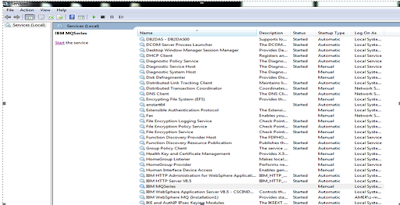
Step 12: Go to Services and find IBM MQSeries and start service.

How to install ibm mq on windows

Step 13: Find IBM WebSpher MQ(Installation X) and go to properties and under Log on option enter password(abc)of created user. or you can simply choose Local system account.Start the service.

How to install ibm mq on windows

Step 14: Go to All Programs and click on “Prepare websphere MQ wizard” and follow the previous steps from 10 and 11.

How to install ibm mq on windows

Step 15: Click on finish

How to install ibm mq on windows

I will discuss about Step-wise how to create remote Queue in IBM MQ in my next post.


Related Topic:


Wednesday, 22 February 2017

MQ Error: 2035 MQRC_NOT_AUTHORIZED or AMQ4036 or JMSWMQ2013

MQ Error: 2035 MQRC_NOT_AUTHORIZED or AMQ4036 or JMSWMQ2013


Problem: If we create a new queue manager in WebSphere MQ 7.1, 7.5, 8.0 or 9.0 or later and try to use a user id(commonly mqm for UNIX and MUSR_MQADMIN on Windows) that is an MQ Administrator to access the queue manager via a server-connection channel (remotely from another host, or locally from the same host and not using bindings mode). You get an error with reason code 2035:

2035 MQRC_NOT_AUTHORIZED

Related error codes:
MQ Explorer => AMQ4036 
MQ classes for JMS => JMSWMQ2013


org.springframework.jms.JmsSecurityException: JMSWMQ2013: The security authentication was not valid that was supplied for QueueManager '' with connection mode 'Client' and host name 'localhost(1417)'.; nested exception is com.ibm.msg.client.jms.DetailedJMSSecurityException: JMSWMQ2013: The security authentication was not valid that was supplied for QueueManager '' with connection mode 'Client' and host name 'localhost(1417)'.
Please check if the supplied username and password are correct on the QueueManager to which you are connecting.; nested exception is com.ibm.mq.MQException: JMSCMQ0001: WebSphere MQ call failed with compcode '2' ('MQCC_FAILED') reason '2035' ('MQRC_NOT_AUTHORIZED'). 

Note: The MQ Administrator can remotely access (via a server-connection channel) without problems other MQ queue managers at version 6 or 7.0.x.

Solution :  If we want the MQ Administrator to be able to access the queue manager via client channels, we have different approach to achieve:

1a. We can add the following two Channel Authentication Records:

The first rule blocks administrative users and the MCAUSER "nobody" (which prevents someone from creating a user ID "nobody" and putting it into an authorized group).
$ runmqsc QmgrName
SET CHLAUTH(*) TYPE(BLOCKUSER) USERLIST('nobody','*MQADMIN')


The second rule provides a reduced blacklist for SYSTEM.ADMIN channels that allows administrators to use these. It is assumed here that some other CHLAUTH rule such as an SSLPEERMAP has validated the administrator’s connection or that an exit has done so.


SET CHLAUTH(SYSTEM.ADMIN.*) TYPE(BLOCKUSER) USERLIST('nobody')

The above rules apply to SYSTEM.ADMIN.SVRCONN which is used by the MQ Explorer. 

If you are using another user-defined channel, such as MY.ADMIN.SVRCONN, then you need to add the following two records:
SET CHLAUTH(MY.ADMIN.SVRCONN) TYPE(ADDRESSMAP) ADDRESS(*) USERSRC(CHANNEL)
SET CHLAUTH(MY.ADMIN.SVRCONN) TYPE(BLOCKUSER) USERLIST('nobody')


Note: it is not advisable to use SYSTEM.DEF.* channels for active connections. The system default channels are the objects from which all user-defined channels inherit properties. The recommended practice is that SYSTEM.DEF.* and SYSTEM.AUTO.* channels should NOT be configured to be usable.

1b. This is a variation of (1a) but allowing the MQ Administrator to only use a particular host.

The first rule blocks MCAUSER "nobody".
SET CHLAUTH(SYSTEM.ADMIN.SVRCONN) TYPE(BLOCKUSER) USERLIST('nobody')

The second rule removes all access to SYSTEM.ADMIN.SVRCONN ...
SET CHLAUTH(SYSTEM.ADMIN.SVRCONN) TYPE(ADDRESSMAP) ADDRESS(*) ACTION(REMOVE)

And the third rule adds an entry for the server that needs access.
SET CHLAUTH(SYSTEM.ADMIN.SVRCONN) TYPE(ADDRESSMAP) ADDRESS(9.xx.xx.8y) USERSRC(CHANNEL)


1c. Disable the Channel Authentication Records feature:


$ runmqsc QmgrName
DISPLAY QMGR CHLAUTH
AMQ8408: Display Queue Manager details.
QMNAME(TEST01) CHLAUTH(ENABLED)

ALTER QMGR CHLAUTH(DISABLED)


WARNING: Disabling this new feature is not recommended for MQ 7.1 production queue managers due to security implications.
Note that disabling CHLAUTH results in a policy that accepts administrative connections by default. The administrative effort to lock down administrative access with CHLAUTH(DISABLED) is much greater than to do so with CHLAUTH(ENABLED). It is therefore recommended to leave CHLAUTH(ENABLED) and use the other security features of WebSphere MQ V7.1 to authenticate administrator connections.

How to use hermes jms in soapui for IBM MQ

How to use hermes jms in soapui for IBM MQ


I discussed on my previous post about how to configure HermesJMS in SOAP UI for IBM MQ.

Today, I am going to discuss about how we will use JMS Session which we created during configuration of hermes jms for sending/receiving messages to/from Queue from SOAP UI.

Prerequisite
  • Destinations/Queues must be created on IBM MQ and Channels are must be started if any.
  • SOAP UI must be configure with Hermes JMS. 
  • JMS session and Destinations/Queues must be defined.

In previous post, we created JMS Session and destinations as below.

How to use hermes jms in soapui for IBM MQ


Use of Hermes JMS in SOAP UI

HermesJMS is an extensible console that helps Tester to create test cases making it easy to browse or search queues and topics, copy messages around and delete them.

Step 1: Create New SOAP Project using any dummy WSDL. You can use WSDL from SoapUI tutorials.

How to use hermes jms in soapui for IBM MQ

How to use hermes jms in soapui for IBM MQ

Once, you will click OK button new SOAP Project will look like below.

How to use hermes jms in soapui for IBM MQ


Step 2: Create New Test Suite by right click on SOAP UI Project created in Step1.

How to use hermes jms in soapui for IBM MQ

How to use hermes jms in soapui for IBM MQ


How to use hermes jms in soapui for IBM MQ

Step 3: Create New Test Case by right click on Test Suite created in Step2.


How to use hermes jms in soapui for IBM MQ


How to use hermes jms in soapui for IBM MQ

Step 4: Create test steps (Type: Test Request) as necessary based on project requirement.

 For example, I will create create three Test Request steps in SOAP UI test case. One Test Request step for Receive Destination Queue to consume message and one Test Request to send request to destination queue and One Test Request step for send and receive messages.


How to use hermes jms in soapui for IBM MQ

How to use hermes jms in soapui for IBM MQ

How to use hermes jms in soapui for IBM MQ

How to use hermes jms in soapui for IBM MQ

Note: Make sure “Add SOAP Response Assertion” check box to be unchecked, otherwise test suite always fails.

Similarly, create HermesTestStep2  and HermesTestStep3. 


How to use hermes jms in soapui for IBM MQ


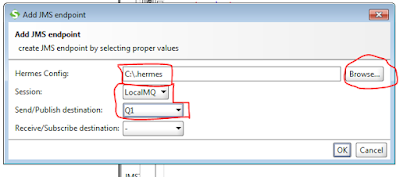
Step 5: Create JMS Endpoints for Receive and send destinations.


How to use hermes jms in soapui for IBM MQ

How to use hermes jms in soapui for IBM MQ

Step 6: Map JMS Endpoints for Receive and send destinations.


  • send only jms://LocalMQ::queue_Q1
  • receive only jms://LocalMQ::-::queue_Q2
  • send and receive jms://LocalMQ::queue_Q1::queue_Q2
How to use hermes jms in soapui for IBM MQ


For Dynamic mock response, you can write Groovy script and also can set JMS header attribute like ReplyTo, Expiration time, time-out etc.


Related Topic:


Saturday, 18 February 2017

Eclipse error: Could not find or load main class com.sun.tools.internal.xjc.XJCFacade

Could not find or load main class com.sun.tools.internal.xjc.XJCFacade


Problem: When I right click a schema file and choose "Generate" and "JAXB Classes", I see the following stack trace in then console:

"java.lang.NoClassDefFoundError: com/sun/tools/xjc/XJCFacade
Caused by: java.lang.ClassNotFoundException: com.sun.tools.xjc.XJCFacade"

Could not find or load main class com.sun.tools.internal.xjc.XJCFacade


Solution: When eclipse project libraries are not pointing to JDK, and instead it is pointing to the JRE, you will get this error "Error: Could not find or load main class com.sun.tools.internal.xjc.XJCFacade". If the JDK path was not configured in your installed JRE's please do the following.

Go to Window -> Preferences, Select Installed JREs. Click on Add and select Standard VM and click Next.

Could not find or load main class com.sun.tools.internal.xjc.XJCFacade 

Could not find or load main class com.sun.tools.internal.xjc.XJCFacade

Select JDK installation directory and click on Finish.

Could not find or load main class com.sun.tools.internal.xjc.XJCFacade

Once you clicked finish button, the JDK entry will be shown in the Installed JREs window. Now select the newly added path and click OK. Eclipse will build all your project.

Could not find or load main class com.sun.tools.internal.xjc.XJCFacade

Now select the xsd file and generate the JAXB classes, it will generate the classes successfully without any error.

Rfhutilc error: Error getting queue names in rfhutilc

Rfhutilc error: Error getting queue names in rfhutilc


Problem: Z/OS system installed with IBM MQ and system configured with Queue manager and Queues. Using rfhutilc.exe, I try to connect and load queues from my window system to Z/OS system, rfhutilc.exe displays as "error getting queue names".

I also set environment variables for MQSERVER but my window system is not installed with IBM MQ.

Solution: rfhutilc.exe will not work alone, system must have installed with IBM MQ to connect with remote Queue manager.


Related Topic:


Friday, 17 February 2017

How to achieve IBM MQ with high availability configuration

How to achieve IBM MQ with high availability configuration


High availability refers to the ability of a system or component to be operational and accessible when required for use for a specified period of time. The system or component is equipped to handle faults in an unplanned outage gracefully to continue providing the intended functionality.

Daisy chains: Bad for high availability:

Daisy-chained components represent a single point of failure as they do not allow for an alternative route in the event of a component failure. A failure of any individual component might result in an outage of the entire application infrastructure.

How to achieve IBM MQ with high availability configuration

Active–active configuration:

To overcome this obstacle, we can employ redundant components . Network connectivity between the redundant components ensures that all components in the architecture are reachable even if one or more components fail. Redundant components can be added in an active pattern where they are actively participating in processing transactions. For push-based technologies (such as HTTP), a load balancer can distribute the traffic equally on the available components.

How to achieve IBM MQ with high availability configuration

Active-Standby Configuration:

An active-passive deployment uses hot or cold standby components to take over in the event that the main component fails. The standby components often exchange heartbeat information with the active components at a configurable time. If a specific number of heartbeats are missed, the standby component takes over as the active component. Some hardware components can also take over the MAC addresses of the network interface card, which allows network switches and load balancers to function normally without having to change any network behaviour.

How to achieve IBM MQ with high availability configuration


Different technologies to achieve WebSphere MQ High Avaiability 
  •  Queue manager clusters
  •  Queue-sharing groups
  •  Multi-instance queue managers
  •  HA clusters
  •  Client reconnection

Queue manager clusters:

A queue manager cluster is a logical group of queue managers. The queue managers can be on most of the platforms supported by MQ. When queue managers are grouped in a cluster, each queue manager can make the queues(and other resources it hosts) available to every cluster member.

The queue manager cluster solution provides a highly available messaging service. It allows messages to be forwarded to any queue manager in the cluster hosting the target queue for application processing. If any queue manager in the cluster fails, new incoming messages continue to be processed by the remaining queue managers as long as at least one of the queue managers hosts an
instance of the target queue.

Sharing cluster queues on multiple queue managers prevents a queue from being a Single point of failures.Cluster workload algorithm automatically routes traffic away from failed queue managers.One of the benefits of queue manager clustering is workload balancing functionality.

Queue-sharing groups:

Shared queues are only available on WebSphere MQ for z/OS. They rely on z/OS-specific features not available on other platforms.

Multi-instance queue managers:

Two instances of a queue manager on different machines,Instances are the SAME queue manager – only one set of data files. One is the “active” instance, other is the “standby” instance.Active instance “owns” the queue manager’s files,Accepts connections from applications.Standby instance monitors the active instance,Applications cannot connect to the standby instance,If active instance fails, standby restarts queue manager and becomes active.

How to achieve IBM MQ with high availability configuration

How to achieve IBM MQ with high availability configuration

How to achieve IBM MQ with high availability configuration

How to achieve IBM MQ with high availability configuration

HA clusters:

HA clusters are groups of two or more computers an  resources such as disks and networks, connected together and configured in such a way that, if one fails, a high availability manager, IBM PowerHA for AIX (formerly HACMP), Veritas Cluster Server, Microsoft Cluster Server, HP  Serviceguard performs a failover. The failover transfers the state data of applications from the failing computer to another computer in the cluster and re-initiates their operation there. This provides high availability of services running within the HA cluster.HA clusters can:
  •    Coordinate multiple resources such as application server database
  •    Consist of more than two machines
  •    Failover more than once without operator intervention
  •    Takeover IP address as part of failover
  •    Likely to be more resilient in cases of MQ and OS defects
  •    In HA clusters, queue manager data and logs are placed on a shared disk
  •    Disk is switched between machines during failover
  •    The queue manager has its own “service” IP address
  •    IP address is switched between machines during failover
  •    Queue manager’s IP address remains the same after failover
  •    The queue manager is defined to the HA cluster as a resource dependent on the shared disk        and the IP address
  •    During failover, the HA cluster will switch the disk, take over the IP address and then start     the queue manager.
How to achieve IBM MQ with high availability configuration

How to achieve IBM MQ with high availability configuration

Reference:

https://www.ibm.com/support/knowledgecenter/SSKM8N_8.0.0/com.ibm.etools.mft.doc/fa70161_.htm

Related Topic

How to install HermesJMS with SoapUI

How to configure HermesJMS in SOAP UI for IBM MQ

Spring jms code with ibm websphere mq example

How to use RFHUTILC.EXE to connect to a remote queue manager


Wednesday, 15 February 2017

How to install HermesJMS with SoapUI

How to install HermesJMS with SoapUI


HermesJMS is a handy open source project hosted by Sourceforge,that can be used to monitor, inspect, and interact with JMS Queues, Topics, and Messages.

HermesJMS is an extensible console that helps you interact with JMS providers making it easy to browse or search queues and topics, copy messages around and delete them. It fully integrates with JNDI letting you discover administered objects stored, create JMS sessions from the connection factories and use any destinations found. Many providers include a plugin that uses the native API to do non-JMS things like getting queue depths (and other statistics) or finding queue and topic names.

It works with many of the popular JMS providers such as Active MQ, Arjuna MQ, Tibco EMS, Fiorano MQ, JBoss MQ, JORAM, OpenJMS, Oracle, Pramati, SAP, SeeBeyond ICAN, SeeBeyond JCAPS, Sonic MQ, WebLogic JMS, WebMethods, and WebSphere MQ

Download open Source Latest version of SOAP UI with HermesJMS.

Step 1: Start it by just double-clicking on it. The installer will start immediately.

How to install HermesJMS with SoapUI

Step 2: You'll see the starting screen.

How to install HermesJMS with SoapUI

Step 3: Just click Next to continue. You'll be asked to accept our license agreement.

How to install HermesJMS with SoapUI

Step 4: After accepting and clicking Next, you'll be able to select the destination folder, which by default is set to C:\Program Files\SmartBear\SoapUI-5.2.0, but can be changed.

How to install HermesJMS with SoapUI

Step 5: Next step gives you the opportunity to include, as additional components, soapUI source files and Hermes installation. You must check HermesJms option.

How to install HermesJMS with SoapUI

Step 6: In case you've chosen to install Hermes, you'll get the Hermes license agreement.

How to install HermesJMS with SoapUI

Step 7:  Then, specify the path to the directory where the tutorials will be installed.


How to install HermesJMS with SoapUI

Step 8: Then, you'll be able to select the Start Menu folder where you want the soapUI shortcut to be added.

How to install HermesJMS with SoapUI

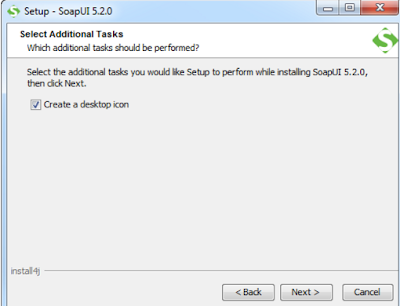
Step 9: and whether you would like desktop icon added.

How to install HermesJMS with SoapUI

Step 10: Finally, by clicking Next, the installation starts.After couple of minutes at most, the installation should be finished and you should see the next screen.

How to install HermesJMS with SoapUI


Related Topic:

How to configure HermesJMS in SOAP UI for IBM MQ