How to install HermesJMS with SoapUI
HermesJMS is a handy open source project hosted by Sourceforge,that can be used to monitor, inspect, and interact with JMS Queues, Topics, and Messages.
HermesJMS is an extensible console that helps you interact with JMS providers making it easy to browse or search queues and topics, copy messages around and delete them. It fully integrates with JNDI letting you discover administered objects stored, create JMS sessions from the connection factories and use any destinations found. Many providers include a plugin that uses the native API to do non-JMS things like getting queue depths (and other statistics) or finding queue and topic names.
It works with many of the popular JMS providers such as Active MQ, Arjuna MQ, Tibco EMS, Fiorano MQ, JBoss MQ, JORAM, OpenJMS, Oracle, Pramati, SAP, SeeBeyond ICAN, SeeBeyond JCAPS, Sonic MQ, WebLogic JMS, WebMethods, and WebSphere MQ
It works with many of the popular JMS providers such as Active MQ, Arjuna MQ, Tibco EMS, Fiorano MQ, JBoss MQ, JORAM, OpenJMS, Oracle, Pramati, SAP, SeeBeyond ICAN, SeeBeyond JCAPS, Sonic MQ, WebLogic JMS, WebMethods, and WebSphere MQ
Download open Source Latest version of SOAP UI with HermesJMS.
Step 1: Start it by just double-clicking on it. The installer will start immediately.
Step 2: You'll see the starting screen.
Step 3: Just click Next to continue. You'll be asked to accept our license agreement.
Step 4: After accepting and clicking Next, you'll be able to select the destination folder, which by default is set to C:\Program Files\SmartBear\SoapUI-5.2.0, but can be changed.
Step 5: Next step gives you the opportunity to include, as additional components, soapUI source files and Hermes installation. You must check HermesJms option.
Step 6: In case you've chosen to install Hermes, you'll get the Hermes license agreement.
Step 7: Then, specify the path to the directory where the tutorials will be installed.
Step 8: Then, you'll be able to select the Start Menu folder where you want the soapUI shortcut to be added.
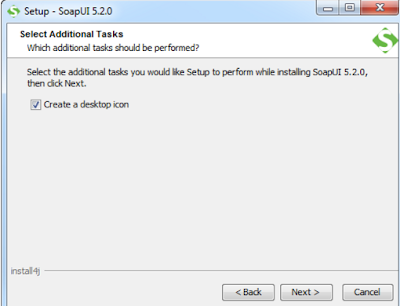
Step 9: and whether you would like desktop icon added.
Step 10: Finally, by clicking Next, the installation starts.After couple of minutes at most, the installation should be finished and you should see the next screen.
Related Topic:


No comments:
Post a Comment